728x90
728x90

stroke-linecap 속성을 이용하자!

https://developer.mozilla.org/en-US/docs/Web/SVG/Attribute/stroke-linecap
<svg viewBox="0 0 6 6" xmlns="http://www.w3.org/2000/svg">
  <!-- Effect of the (default) "butt" value -->
  <line x1="1" y1="1" x2="5" y2="1" stroke="black" stroke-linecap="butt" />

  <!-- Effect of the "round" value -->
  <line x1="1" y1="3" x2="5" y2="3" stroke="black" stroke-linecap="round" />

  <!-- Effect of the "square" value -->
  <line x1="1" y1="5" x2="5" y2="5" stroke="black" stroke-linecap="square" />

  <!--
  the following pink lines highlight the
  position of the path for each stroke
  -->
  <path d="M1,1 h4 M1,3 h4 M1,5 h4" stroke="pink" stroke-width="0.025" />
</svg>
728x90
728x90

ahocorasick 알고리즘은 문자열 검색 알고리즘 중 하나로, 다중 문자열 검색(multiple pattern matching)을 수행하는 알고리즘입니다.

문자열들을 Trie 자료구조로 생성하고, 이를 기반으로 탐색하여 문자열 검사를 실시합니다.

핵심 사항은 검색 하고자하는 문자열을 입력으로 받은 후에 검색이 끝나기전에 검색결과가 나온후에는 다시 앞으로 돌아가는것는 과정이 포함됩니다. 실패 링크

https://ko.wikipedia.org/wiki/%EC%95%84%ED%98%B8_%EC%BD%94%EB%9D%BC%EC%8B%9D_%EC%95%8C%EA%B3%A0%EB%A6%AC%EC%A6%98

class Node:
    def __init__(self,text):
        self.text = text
        self.last = 0
        self.output = ""
        self.child = {}
        self.fail = None
        self.rank = 0
    def show(self):
        print( "text:", self.text, "output:",self.output, "fail:", self.fail.text if self.fail is not None else "None","rank:",self.rank)
        if self.last:
            print( "LAST OUTPUT : ", self.output)
        for k in self.child.keys():
            s = self.child[k]
            s.show()
class AhocorasickTrie:
    
    def __init__(self):
        self.no = 0
        self.root = Node(None)
    
    def add(self,text):
        rank = 0
        currentNode = self.root
        for t in text:
            if t not in currentNode.child:
                self.no +=1
                currentNode.child[t] = Node(t)
                print(f"ADD : {t} || Current No. : {self.no}")
            currentNode.rank = rank
            rank+=1
            currentNode = currentNode.child[t]
        currentNode.output = text
        currentNode.last = 1
        currentNode.rank = rank
        print(f"TOTAL : {self.no}")
        
        
    def set_failur(self):
        queue = []
        for c,node in self.root.child.items():
            node.fail = self.root
            queue.append(node)
        while queue:
            currentNode = queue.pop(0)
            for t,node in currentNode.child.items():
                fail_node = currentNode.fail
                while fail_node and t not in fail_node.child:
                    fail_node = fail_node.fail
                if fail_node:
                    node.fail = fail_node.child[t]
                else:
                    node.fail = self.root
                queue.append(node)
    
    def show(self):
        self.root.display()  
        
    def find(self,text):
        result = []
        currentNode = self.root
        for t in text:
            while currentNode is not None and t not in currentNode.child:
                print("fail",currentNode.text)
                currentNode = currentNode.fail
            if t in currentNode.child:
                currentNode = currentNode.child[t]
                if currentNode.output != "":
                    result += [currentNode.output]
                    print(result,t,currentNode.output,currentNode.last,currentNode.output)
                    
        return result


728x90
728x90

Trie는 문자열 검색 알고리즘 중 하나로, 문자열을 저장하고 검색하는 데 유용합니다.

이진 탐색 트리와 달리, Trie는 문자열을 저장하는 트리 자료구조입니다.

Trie의 각 노드가 문자열의 한 문자에 대응되는 것입니다.

Trie를 이용해 문자열을 빠르게 검색 할 수 있습니다.

검색을 수행할 문자열을 루트에서 시작해 각 문자에 해당하는 노드들을 따라 검색을 합니다.

class Node:
    def __init__(self,text):
        self.text = text
        self.last = 0
        self.child = {}
        
class Trie:
    
    def __init__(self):
        self.no = 0
        self.root = Node(None)
    
    def add(self,text):
        currentNode = self.root
        for t in text:
            if t not in currentNode.child:
                self.no +=1
                currentNode.child[t] = Node(t)
                print(f"ADD : {t} || Current No. : {self.no}")
            currentNode = currentNode.child[t]
        currentNode.last = 1
        print(f"TOTAL : {self.no}")
        
    def find(self,text):
        result = ""
        currentNode = self.root
        for t in text:
            if t in currentNode.child:
                result += t
                currentNode = currentNode.child[t]
        return result
728x90
728x90

React 프로젝트를 CRA 로 시작하게 되면 기본적인 리액트 로고가 favicon으로 들어가 있게 됩니다.

이러한 로고를 새로만든 제 로고로 변경해보고자 합니다.


온라인 사이트에는 favicon을 만들어 주는 사이트가 많이 있습니다. 저는 예전부터 주로 사용했던 favicon-generator에서 로고 이미지를 업로드해서 사이즈별 이미지를 다운로드 받아 적용시켜 보려고 합니다.

https://www.favicon-generator.org/ 


1. Logo File 업로드 && Generate

우선 사이트에 접속하면 위와 같은 화면을 만날 수 있습니다.

파일선택부분을 클릭해 로고 파일을 업로드 해 줍니다. 저는 1024*1024 사이즈의 로고이미지를 만들었습니다.

업로드 후에 몇사기 선택을 할 수가 있습니다.

여기에서 저는 Web,Android,MS,IOS 에 쓰이는 ICON도 함께 만들어 주려고 합니다. 이유는?? 나중에!

Include ~~public~~과 Maintain~~은 헤제해 줍니다.

그런다음 Create Favicon을 클릭해 Favicon을 만들어 줍니다.


2.Download && 적용


Create를 진행하면 다운로드 받을 수 있는 페이지로 이동하고, head에 입력하는 코드가 나옵니다.

우선 다운로드!


다운로드 받은 zip 파일의 압출을 풀면 그 안에 사이즈별 ICON과 Manifest.json등등 파일이 있습니다.

우선 이 file을 public 디렉토리 안에 icon 디렉토리를 새로 생성하고 복사해 줍니다.

이제 이 ICON들을 적용 시켜 주기 위해서  public에 있는 index.html 의 head에 있는 코드를 수정해 줍니다.

<!DOCTYPE html>
<html lang="en">
  <head>
    <meta charset="utf-8" />
    <link rel="icon" href="%PUBLIC_URL%/favicon.ico" />
    <meta name="viewport" content="width=device-width, initial-scale=1" />
    <meta name="theme-color" content="#000000" />
    <meta name="description" content="Web site created using create-react-app" />
    <link rel="apple-touch-icon" href="%PUBLIC_URL%/logo192.png" />


    <link rel="manifest" href="%PUBLIC_URL%/manifest.json" />


    <title>React App</title>
  </head>
  <body>
    <noscript>You need to enable JavaScript to run this app.</noscript>
    <div id="root"></div>

  </body>
</html>

이 중에서 수정해야할 부분은 <link rel="icon" href="%PUBLIC_URL%/favicon.ico" /> 의 경로를 수정해 주고 

<link rel="apple-touch-icon" href="%PUBLIC_URL%/logo192.png" /> 은 삭제 처리 해 줍니다.


<!DOCTYPE html>
<html lang="en">
  <head>
    <meta charset="utf-8" />
    <link rel="icon" href="%PUBLIC_URL%/icon/favicon.ico" />
    <meta name="viewport" content="width=device-width, initial-scale=1" />
    <meta name="theme-color" content="#000000" />
    <meta name="description" content="Web site created using create-react-app" />


    <link rel="manifest" href="%PUBLIC_URL%/manifest.json" />


    <title>React App</title>
  </head>
  <body>
    <noscript>You need to enable JavaScript to run this app.</noscript>
    <div id="root"></div>

  </body>
</html>

이제 사이트에 있는 코드를 head에 붙여 넣어 줍니다.


<!DOCTYPE html>
<html lang="en">
  <head>
    <meta charset="utf-8" />
    <link rel="icon" href="%PUBLIC_URL%/icon/favicon.ico" />
    <meta name="viewport" content="width=device-width, initial-scale=1" />
    <meta name="theme-color" content="#000000" />
    <meta name="description" content="Web site created using create-react-app" />


    <link rel="manifest" href="%PUBLIC_URL%/manifest.json" />


    <link rel="apple-touch-icon" sizes="57x57" href="%PUBLIC_URL%/icon/apple-icon-57x57.png">
    <link rel="apple-touch-icon" sizes="60x60" href="%PUBLIC_URL%/icon/apple-icon-60x60.png">
    <link rel="apple-touch-icon" sizes="72x72" href="%PUBLIC_URL%/icon/apple-icon-72x72.png">
    <link rel="apple-touch-icon" sizes="76x76" href="%PUBLIC_URL%/icon/apple-icon-76x76.png">
    <link rel="apple-touch-icon" sizes="114x114" href="%PUBLIC_URL%/icon/apple-icon-114x114.png">
    <link rel="apple-touch-icon" sizes="120x120" href="%PUBLIC_URL%/icon/apple-icon-120x120.png">
    <link rel="apple-touch-icon" sizes="144x144" href="%PUBLIC_URL%/icon/apple-icon-144x144.png">
    <link rel="apple-touch-icon" sizes="152x152" href="%PUBLIC_URL%/icon/apple-icon-152x152.png">
    <link rel="apple-touch-icon" sizes="180x180" href="%PUBLIC_URL%/icon/apple-icon-180x180.png">
    <link rel="icon" type="image/png" sizes="192x192"  href="%PUBLIC_URL%/icon/android-icon-192x192.png">
    <link rel="icon" type="image/png" sizes="32x32" href="%PUBLIC_URL%/icon/favicon-32x32.png">
    <link rel="icon" type="image/png" sizes="96x96" href="%PUBLIC_URL%/icon/favicon-96x96.png">
    <link rel="icon" type="image/png" sizes="16x16" href="%PUBLIC_URL%/icon/favicon-16x16.png">
    <!-- <link rel="manifest" href="/manifest.json"> 삭제 !!-->
    <meta name="msapplication-TileColor" content="#ffffff">
    <meta name="msapplication-TileImage" content="%PUBLIC_URL%/icon/ms-icon-144x144.png">
    <meta name="theme-color" content="#ffffff">

    <title>React App</title>
  </head>
  <body>
    <noscript>You need to enable JavaScript to run this app.</noscript>
    <div id="root"></div>

  </body>
</html>

그런데 icon 들을 icon 디렉토리에 넣었으므로 경로를 수정해 주어야 합니다. 기존 경로에 %PUBLIC_URL%/icon 을 추가해 줍니다. 

그리고 manifest 파일은 위에서 설정되어 있으므로 삭제 처리 해줍니다.


추가적으로 기존 mainfest.json에 있는 icons의 항목에 다운로드 받은 mainfest.json을 추가해줍니다.

{
  "short_name": "React App",
  "name": "Create React App Sample",
  "icons": [
    {
      "src": "icon/favicon.ico",
      "sizes": "64x64 32x32 24x24 16x16",
      "type": "image/x-icon"
    },
    {
      "src": "logo192.png",
      "type": "image/png",
      "sizes": "192x192"
    },
    {
      "src": "logo512.png",
      "type": "image/png",
      "sizes": "512x512"
    },
    {
      "src": "icon/android-icon-36x36.png",
      "sizes": "36x36",
      "type": "image/png",
      "density": "0.75"
    },
    {
      "src": "icon/android-icon-48x48.png",
      "sizes": "48x48",
      "type": "image/png",
      "density": "1.0"
    },
    {
      "src": "icon/android-icon-72x72.png",
      "sizes": "72x72",
      "type": "image/png",
      "density": "1.5"
    },
    {
      "src": "icon/android-icon-96x96.png",
      "sizes": "96x96",
      "type": "image/png",
      "density": "2.0"
    },
    {
      "src": "icon/android-icon-144x144.png",
      "sizes": "144x144",
      "type": "image/png",
      "density": "3.0"
    },
    {
      "src": "icon/android-icon-192x192.png",
      "sizes": "192x192",
      "type": "image/png",
      "density": "4.0"
    }
  ],
  "start_url": ".",
  "display": "standalone",
  "theme_color": "#000000",
  "background_color": "#ffffff"
}

마찬가지로 기존 경로에 icon 을 추가 해 주었습니다.


서버를 reload하면 

파비콘이 바뀐걸 확인 할 수 있습니다. 


PortFolio : https://hiio420.com  

Figma: https://www.figma.com/file/WJVwsW99LwZ2B1W3PKDASM/Hiio420?node-id=0%3A1&t=W1IV0P9M12hXOVpp-1


728x90
728x90

이제 화면을 구현해 보는 단계입니다.

먼저 화면을 구현하기위해 작성한 화면 구성은 크게 로고 + 상단 텍스트 + 하단 텍스트 +페이지 링크 네비게이션 4부분으로 나눌 수 있습니다.


양옆으로 70px 정도로 padding이 있고 각 세로로 가운데 정렬이 필요합니다.

div id="main" 태그안에 id="intro" 태그를 추가하고 총 4개의 div 태그를 추가해 줍니다. 


1. 첫번째 div 안에 3개 div 를 추가해 주고 각각 FOR, FULL STACK , DEVELOPER 텍스트를 넣어 주었습니다.

2. 두번째 div 안에는 img 태그를 사용해 로고 이미지를 넣어 줬습니다.

2-1. 로고 이미지는 svg 파일로 resources 디렉토리에 저장 되어있어 import logo form ~~ 로 svg 파일을 불러와 

<img src={logo} alt="logo" /> 로 넣어 줍니다.

3. 3번째 div 안에는 1개의 div 를 추가하고 각각 EXPERIENCE 를 입력해 줍니다.

4. 4번째 div 안에는 4개의 div 를 추가하고 각각 INTRODUCTION , WORK, DEMO ,BLOG 를 입력해 줍니다.


// src/pages/Main/main.js

import logo from "../../resources/image/svg/logo.svg";

export default function Main() {
  return (
    <div id="main">
      <div id="intro">
        <div>
          <div>For</div>
          <div>FULL STACK</div>
          <div>DEVELOPER</div>
        </div>
        <div>
          <img src={logo} alt="logo" />
        </div>
        <div>
          <div>EXPERIENCE</div>
        </div>
        <div>
          <div>INTRODUCTION</div>
          <div>WORK</div>
          <div>DEMO</div>
          <div>BLOG</div>
        </div>
      </div>
    </div>
  );
}

CSS Style 입히기


이제 style을 입혀 볼 차례입니다. style은 css를 사용하려고 합니다. 

Main.js 와 같은 디렉토리에 main.css를 만들고 import 해 줍니다.

import "./main.css";


id="main" 의  스타일을 먼저 정의해 줍니다. 

너비는 100%로 하고, 높이는 현재 브라우저 높이의 크기만큼 주었습니다. flex 속성을 통해서 가로+세로 가운데로 정렬 시켜 줍니다.

/* src/pages/Main/main.css */

#main {
  width: 100%;
  height: 100vh;
  display: flex;
  justify-content: center;
  align-items: center;
}


id = "intro" 의 스타일을 넣어줍니다.

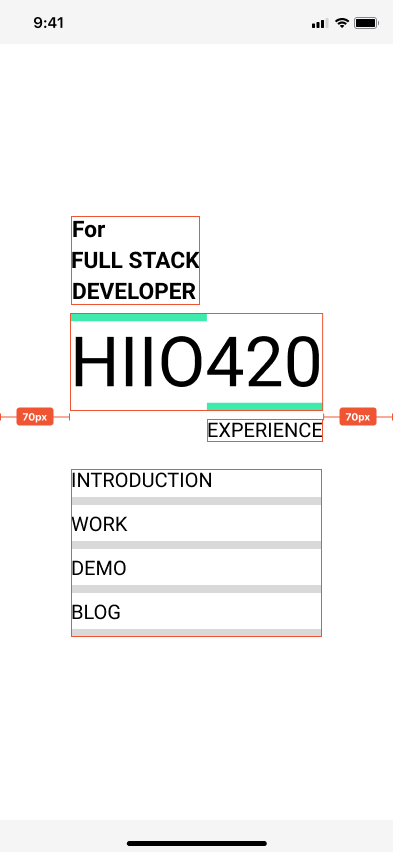
intro의 경우에는 main과 똑같이 flex 속성을 가지지만, flex-direction 값으로 column 을 주어 세로로 flex 속성 값들을 반영해 줍니다. 각 태그들의 사이를 8px 정도로 띄어줍니다. width는 100% 이지만, 400px은 넘어가지 않게 max-width 값을 주었고, 양옆으로 padding 70px 씩 입력해 줍니다.

/* src/pages/Main/main.css */

#main {
  width: 100%;
  height: 100vh;
  display: flex;
  justify-content: center;
  align-items: center;
}
 
#intro {
  width: 100%;
  max-width: 400px;
  padding: 0 70px;
  display: flex;
  flex-direction: column;
  gap: 8px;
}


이미지 로고가 너무 크기 때문에 화면에서 넘쳐 스크롤이 생깁니다.

img 의 max-width 값을 100% 로 해서 intro의 너비에 맞게 맞춰 줍니다.

/* src/pages/Main/main.css */

#main {
  width: 100%;
  height: 100vh;
  display: flex;
  justify-content: center;
  align-items: center;
}

#intro {
  width: 100%;
  max-width: 400px;
  padding: 0 70px;
  display: flex;
  flex-direction: column;
  gap: 8px;
}

#intro img {
  max-width: 100%;
}


이제 이미지 로고를 기준으로 위 아래에 위치한 텍스트들의 스타일을 입혀야 합니다. 

이때는 따로 className이나 id 값을 부여 하지는 않고 nth-child 를 이용해 스타일을 입혀 보려고 합니다.


먼저 

1. intro의 첫번째 div를 선택해 주고, font-weigh,font-size ,display,gap 속성의 값들을 입력해 줍니다.

font-size의 경우에는 clamp 를 이용해서 모바일 - 데스크탑 화면 / 해상도 너비 별로 크게 벗어 나지 않게 입력해 주었습니다.

#intro > div:nth-child(1) {
  display: flex;
  flex-direction: column;
  gap: 8px;
  font-weight: 600;
  font-size: clamp(10px, 6vw, 32px);
}

3. 3번째 div 도 1번째 div와 마찬가지로 clamp를 활용해 font-size를 설정해 주고 text-align으로 오르쪽으로 정렬 시켜 주었습니다.


/* src/pages/Main/main.css */

#main {
  width: 100%;
  height: 100vh;
  display: flex;
  justify-content: center;
  align-items: center;
}

#intro {
  width: 100%;
  max-width: 400px;
  padding: 0 70px;
  display: flex;
  flex-direction: column;
  gap: 8px;
}

#intro img {
  max-width: 100%;
}

#intro > div:nth-child(1) {
  display: flex;
  flex-direction: column;
  gap: 8px;
  font-weight: 600;
  font-size: clamp(10px, 6vw, 32px);
}


#intro > div:nth-child(3) {
  text-align: right;
  gap: 8px;
  font-size: clamp(10px, 5vw, 30px);
}


이제 마지막 4번째 div 입니다.

4. 4번째 div의 경우 3번째 div와 간격이 더 있기 째문에 margin-top 속성의 값을 설정해 주었습니다. flex, column,gap 으로 각 div들의 간격을 맞춰 주었습니다.


5. 4번째 div 안에 속해 있는  자식 div elements들의 height를 임의로 맞춰 주고 border-bottom으로 밑에 라인을 생성해 주었습니다. box-sizing 을 통해서 테두리를 기준으로 크기를 정해 줍니다.

/* src/pages/Main/main.css */

#main {
  width: 100%;
  height: 100vh;
  display: flex;
  justify-content: center;
  align-items: center;
}

#intro {
  width: 100%;
  max-width: 400px;
  padding: 0 70px;
  display: flex;
  flex-direction: column;
  gap: 8px;
}

#intro img {
  max-width: 100%;
}

#intro > div:nth-child(1) {
  display: flex;
  flex-direction: column;
  gap: 8px;
  font-weight: 600;
  font-size: clamp(10px, 6vw, 32px);
}

#intro > div:nth-child(3) {
  text-align: right;
  gap: 8px;
  font-size: clamp(10px, 5vw, 30px);
}

#intro > div:nth-child(4) {
  margin-top: 27px;
  display: flex;
  flex-direction: column;
  gap: 16px;
  font-size: clamp(10px, 5vw, 22px);
}

#intro > div:nth-child(4) > div {
  box-sizing: border-box;
  border-bottom: 8px solid #d9d9d9;
  height: 36px;
}


어느정도 제가 기획한 화면에 가깝게 나온거 같아 괜찮은거 같습니다.


이제 각 아래에 위치한 INTRODUCTION,WORK,DEMO,BLOG 부분에 effect 와 링크를 걸어보는 포스트를 다음에 작성해 보겠습니다. 


PortFolio : https://hiio420.com  

Figma: https://www.figma.com/file/WJVwsW99LwZ2B1W3PKDASM/Hiio420?node-id=0%3A1&t=W1IV0P9M12hXOVpp-1


728x90
728x90
728x90

+ Recent posts